Introduction to MTB Rear Shock Mounting Hardware
In order for a rear shock to properly fit on your mountain bike, it needs the right mounting hardware. Mounting hardware is one of those things that often causes people to overthink it but in-fact, it’s quite simple.
This blog has three sections:
1. What is mounting hardware?
2. What size hardware do you need?
2a. Using the internet to determine the size you need
2b. How to measure mounting hardware yourself
3. How to remove and install mounting hardware?
3a. How to remove mounting hardware
3b. How to install mounting hardware
If you already know what mounting hardware is and just need help with sizing and install, feel free to skip ahead to the sections applicable to you.
Watch the video or read on!
What Is Mounting Hardware?
A new shock with empty eyelets
When taking a look at a brand new, aftermarket rear shock, you’ll notice that there’s an open hole on each end. These are known as eyelets. If I try to install this shock on a bike, it won’t fit as the space in the frame is wider than the shock eyelet itself, and the bolt is way too small for the eyelet. To make it fit properly, you’ll need mounting hardware.
Simply put, mounting hardware is just an adapter to make a rear shock’s eyelet fit properly in a frame, and every frame uses different sizes.
Mounting hardware is made up of a few bits
Generally speaking, mounting hardware consists of:
- A bushing that presses into the shock eyelet
- A center sleeve
- An o-ring on each side
- Spacers that cover the exposed part of the installed center sleeve
And here’s how it looks fully installed:
A shock with Fox mounting hardware installed
Trunnion style shocks are super common these days, which only have one open eyelet. The other end bolts directly into the frame. Therefore, trunnion shocks only require mounting hardware on the open eyelet end. Also, some frames use an “open eyelet” design. Frames with an open eyelet design use a fixing bolt, which is the same size as a shock eyelet, therefore they do not require any mounting hardware.
A trunnion style shock
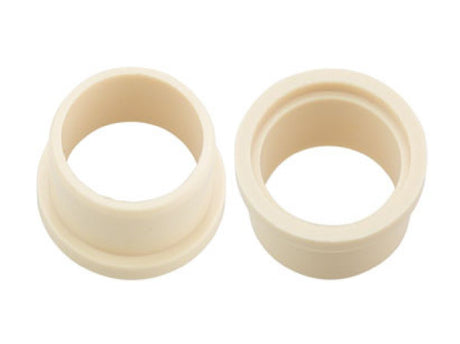
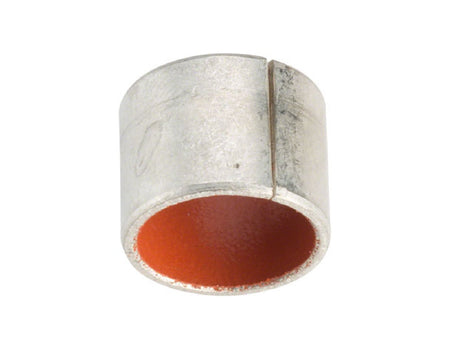
Now let’s take a closer look at what makes up mounting hardware. There are two types of inner bushings, either metal or poly. The metal ones are most commonly used in RockShox mounting hardware, and the poly or “IGUS” bushings are most commonly used in Fox and Marzocchi mounting hardware.
The two types of bushings; poly (IGUS) and metal
Now, remember when we talked about that open shock eyelet?
The size of that eyelet is standard across mostly all modern shocks including Fox, RockShox, Marzocchi, DVO, and more. This means mounting hardware is 100% cross compatible between all of these shocks. You can use RockShox mounting hardware in a Marzocchi shock, or use Fox mounting hardware in a DVO shock, and so forth. The only exceptions are Cane Creek shocks from model year 2016 and older, and Ohlins shocks from model year 2017 and older. These shocks used their own eyelet sizing. If your shock falls into one of those groups, you’ll need specific hardware from Cane Creek or Ohlins to fit.
The standard open shock eyelet
If you’re reading this, you’re likely in one of three scenarios.
Scenario One. You have a brand new, bare frame without a shock and you’re installing a shock on it. In this scenario, you’ll just need to purchase new mounting hardware since you don’t have any.
Scenario Two. You’re buying a second shock so you can have a spare in case your current shock blows up before race day. Alternatively, you want to have two different styles of shocks to swap between depending on where you’re riding. For example, you might have one air shock for longer pedals and one coil shock for gnarlier terrain and shuttle days. In this scenario, it’s easiest to buy a new set of mounting hardware for the new shock. This is much easier than having to fiddle with removing and installing the hardware each time you want to swap out the shocks. Trust me, mounting hardware is cheap and this will save you lots of time.
Scenario Three (which is the most likely scenario). You are replacing your bike’s current rear shock with a new one. Maybe you’re doing an upgrade, going from air to coil, or because your shock is damaged and needs replacement. In this scenario, we recommend purchasing new mounting hardware to make install super easy, especially if your current hardware is old or worn out and needs to be replaced anyways. Alternatively, you can uninstall your current shock’s mounting hardware, if it is not too worn out, and install it in the new shock.
What Size Mounting Hardware Do I Need
For My Rear Shock?
All frames use different sizes of mounting hardware. This isn’t frame size specific, just specific to the year, make and model. For example, a 2017 Specialized Enduro uses different hardware than a 2020 Transition Sentinel, but a Small 2020 Transition Sentinel uses the same size as an XL 2020 Sentinel.
This means that you’ll need to get the exact size of mounting hardware that your frame requires for proper fitment. Mounting hardware has two labeled dimensions. m8x30 is a common size to use for an example.
M8 is the outer diameter of the frame bolt that goes through the shock eyelet. Generally you’ll only see this measurement be M6, M8 or M10. The other number, 30 in this case, is the width of the entire hardware. This number can range from 15 millimeters all the way up to about 70 millimeters.
But, how do you figure out what size hardware do you need for your bike?
Well, there’s two methods.
Method #1: Use The Internet
Our website has a shock mounting hardware database which doesn’t have every bike ever made on there, but we have most modern, popular bikes. This database is a constant work in progress and the information is laid out simply. Apart from listing which size mounting hardware you will need, the database also tells you what shock size the bike uses, and says "TR" for bikes that use a trunnion shock or "Open Eyelet" for bikes that use that just use that design.
We recommend checking that database first.
The database on our website
"Trunnion" and "Open Eyelet" labels
But, if you don’t see it on our website, just open a new tab.
Let’s say you have a current model year Santa Cruz Hightower. Simply go to the Santa Cruz Hightower product page, scroll down to the specs and you’ll see they list the shock mounting bushing sizes. It shows the front uses "20x8mm" and the rear uses "30x8mm" which is “Bearing Compatible”. Although it says “Mounting Bushing” that is merely another way of saying “mounting hardware”. Rather than saying "m8x30" it says "30x8mm" - again, the same thing.
The labels on Santa Cruz's website
So, this frame’s bolt that is installed through the shock eyelet has an external diameter of 8mm, and the width of the frame where the front end of the shock sits is 30mm, while the rear end is 20mm. So you would need to buy two sets of hardware: m8x30 and m8x20.
Depending on the brand or store, it could be labeled as 30xm8, 8mm x 30, or m8x30, but they all mean the same thing. Further, you'll notice it says “Bearing Compatible”. Some mounting hardware uses bearings in the hardware for less stiction in the suspension, and this frame is compatible with that. Run it if you’d like!
If your bike isn’t the current newest model, look for a bike archive on the brand’s website. Brands like Transition and Santa Cruz are great examples which show all specs of older bike models including shock hardware sizes
Transition Bike's Archives
If a bike company’s website doesn’t list the hardware size, look for an exploded view diagram or user’s manual of the bike or frame. You can often find that information on the bike product page or in the service and tech support section of a company’s website. We often find mounting hardware sizes for brands like YT in the exploded view diagrams in the "downloads" section of their website.
If you can't find the mounting hardware sizes listed anywhere, you can always call the bike brand directly and ask them.
But, if ALL of that fails you and the bike brand doesn't know, then it's time to take matters into your own hands...
Method #2: Measure Your Mounting Hardware Yourself
Grab some calipers, or a fine ruler with millimeters, and measure your current shock’s installed mounting hardware or measure the frame and bolt. If you grab the shock with hardware installed, simply measure the internal diameter of the hole where the bolt goes, and then measure how wide the mounting hardware is from side to side.
I just measured my hardware, and the bolt hole is 8mm and the hardware measures 20mm from side to side. So I would need to purchase m8x20 mounting hardware. This is a trunnion shock, so I only need to measure the bottom eyelet as the top bolts directly to the frame.
Measuring bolt hole
Measuring hardware side to side
Alternatively, if for example, you don't already have mounting hardware to measure, you could measure the frame and bolt. The shock fixing bolt measures in at an external diameter of 8mm and the area where the shock sits measures at 20mm wide.
Measuring the diameter of the shock mounting bolt
Measuring the inside of where the shock sits in the frame
So now that you know what size hardware you need, and have purchased it, it’s time to install it.
How To Remove and Install MTB Mounting Hardware
This is an extremely easy job to do when you have the proper tools. However, it’s totally doable without them, just a little more frustrating.
The proper tools are:
- A vise with soft jaws
- A hardware removal tool
- DU bushing removal tool
A vice with soft jaws
Hardware pin removal tool
DU bushing removal tool
Removing Mounting Hardware
First, we’ll remove mounting hardware with both styles of bushings, and then install both styles on a shock. Removal is most of the labor, and installing is much easier. If you don’t need to remove any hardware, you can skip ahead to the installation part.
Before we begin, we wanted to show you what little pieces are included in Fox and RockShox mounting hardware since that’s constitutes nearly all mounting hardware on bikes out there. If you have a different brand, it’s either identical or nearly identical with the same principles.
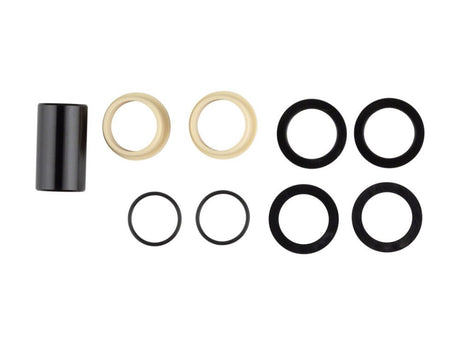
Fox hardware has outer spacers on both sides, an o-ring on each side, an inner pin and a bushing that presses into the eyelet. Older Fox hardware has one outer spacer on both sides, but newer Fox hardware has one large spacer and one thin crush spacer on each side. Fox hardware uses the poly IGUS bushing, but much older Fox hardware uses a steel bushing.
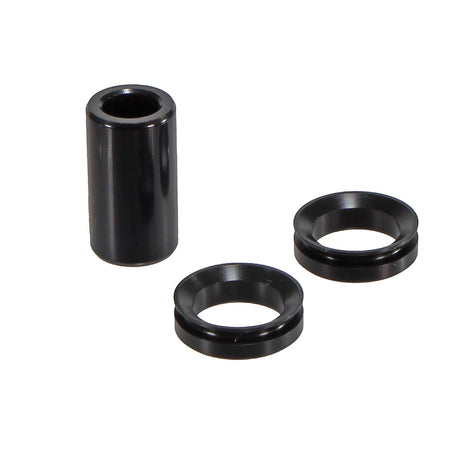
RockShox hardware is about the same, but just uses one spacer with an integrated o-ring on each side, and a metal DU bushing.
Fox hardware
Rockshox Hardware
Some really old shocks use 2-piece alloy hardware, but very few bikes have these anymore and they just pop out by hand. Alright, let’s uninstall some hardware. Proceed carefully, and whenever working around suspension, the end goal is to not scratch anything.
First, you’ll need to remove the outer spacers and inner pin from the hardware. Try removing it by hand, which works on most RockShox hardware. If it won’t come off by hand then you’ll need to use the power of the vise to remove it. Grab your hardware removing tool, line it up in the shock, place it in the vise and press it out by tightening the vise.
Removing the hardware with a proper hardware removal tool
Now you just have to remove the inner bushing. There’s two styles, either metal or poly.
First let’s start with the poly bushing since they are easier to remove. Simply take a flat head screwdriver, place it in the split between the bushings in the middle, and pry outward to pop it out. Then repeat on the other side. Don’t worry if you slightly scratch the surface inside the eyelet.
Now onto a metal bushing, which is properly pressed in there, meaning it needs to be pressed out. Take the DU bushing tool, place it in the vise with the shock and press out the bushing.
The metal DU Bushing in the eyelet
Pressing the bushing out with a
DU Bushing removal tool
Ok now that that’s done, you’ve noticed that we use a couple different tools in the shop to make this super easy, since we work on so many shocks. However, you might be able figure out that you could use a couple of sockets rather than a proper bushing tool to do this job, if you’re somewhat mechanically inclined.
You basically just need something to push on one side and catch on the other. We aren’t going to tell you some magic combination of sockets to use as all different brands and styles of sockets are different thicknesses, so perform this at your own risk. Just make sure the pushing tool is at least as large as the inner diameter of the piece you’re pushing, but smaller than the eyelet size. Make sure the catching tool is large enough and long enough to catch the entire pin, but still small enough to sit on the shock eyelet so it doesn’t move a bunch when in the vise.
When using sockets instead of a proper DU bushing tool, you do run the risk of marring the anodized finish on the end of your shock, so please just take your time to do a good job. If you aren't feeling confident, you can always find a good local bike shop with a bushing tool to do it for you. If it feels like something isn’t working, stop what you’re doing to change your socket sizes as you don’t want to force something and damage the mounting hardware or your shock eyelet.
Installing Mounting Hardware
Installing mounting hardware is much easier - you’ll still need a vise with soft jaws for this.
The first step is to install the bushing. If you have the poly/IGUS bushing, these can just be popped in by hand for the first bit, and then you can fully press them in by carefully pushing them down on the end of a work bench. If you have a metal DU bushing, simply line up the shock and bushing in the vise with soft jaws, and then tighten the vise until the bushing is fully pressed into the shock eyelet.
Beginning to press in the Poly/IGUS bushings
The bushings installed
Now, grab the sleeve/pin, push it in as much as you can by hand, and then finish pushing it in with the vise. Some of these are longer than others, and you’ll want to center the shock eyelet in the middle of the sleeve by wiggling the shock up and down while also sliding the pin sideways towards the center. Just eyeball it and get it as close to center as possible.
Now for the o-rings. If you have a poly/IGUS bushing, just carefully push the o-rings into the grooves on the bushing by hand. If you have a different style of hardware, these o-rings are probably built into the outer hardware. Now, grab the outer hardware, and slide those onto the sleeve as far toward the eyelet as possible. Then just pop the shock in the vise and tighten it to center everything.
The O-rings installed
If you have newer Fox hardware, there are these thin crush washers that go on the outside, and you’ll notice these little, uhh nipples, or crush beads. Around the shop, we tend to use the phrase “nips out” for this. So point the nips outward and slide these onto the sleeve.
"Nips out"
You may need to just pop it in the vise one more time to center everything. And wallah! Your mounting hardware is now installed. Do this on the other eyelet if applicable, and install the shock on your bike.
When you order a shock and mounting hardware from us, you can request for us to install the hardware before shipping the shock to you, so all you have to do is just bolt on the shock and go ride.
Mounting hardware installed on a shock
A trunnion style shock installed on a bike with mounting hardware on the bottom
Now before we go, we had some other special notes to mention.
First, the frame bolts that go through the frame, through the eyelet, and thread into the frame on the other side are specific to the frame, and are not part of mounting hardware. The same is with trunnion shocks. The bolts that go through the frame, into the shock, and any small washers between the frame and shock are specific to the frame, and are not part of the mounting hardware. Also, some brands use proprietary hardware which is not available aftermarket. For example, many Treks use proprietary offset hardware, which must be purchased from Trek directly.
Some brands offer bike specific shock models. This primarily pertains to RockShox, who offer quite a few bike specific models, which includes mounting hardware in the box. If the bike the shock is designed for uses bearing hardware, they are currently using a specific bearing eyelet. The bearing cannot be removed to use it on another bike that does not use a bearing mount.
Last, but most certainly not least, if your bike calls for m8x22 mounting hardware (for example), you'll notice most companies don't actually make hardware in that size. In this case, you will want to go with the slightly smaller size of m8x21.8 since your frame can tolerate that small difference of the smaller size. You will not be able to size up and use m8x22.2 as the frame cannot expand to fit the larger size. This also happens with some other sizes as well.
We only recommend using a slightly smaller size when the exact size you need is not being produced.